If you’ve found this blog about Facebook management, you’re likely a business owner who understands that social media is a vital part of your marketing repertoire.
However, you might be struggling currently with gaining any engagement or an acceptable return-on-investment for your time.
Or you might not be doing much at all because it’s one big, confusing mess.
We get that. And we’re here to help with this complete guide that will discuss:
- The differences between a profile, page, and event on Facebook
- The difference between organic posts, ads, and a boosted post
- What statistics ACTUALLY MATTER
Don’t worry about trying to scroll past the parts you don’t need to see as you can skip ahead to the part you want below.
Facebook management for businesses
Facebook pages
OK, so it’s 2021 and you likely have a Facebook profile. If you do not and want to learn how to create a one, here is a Facebook article on how to do it and a form to fill out for help if you run into trouble.
You will need a profile to start and manage a page for your business.
And therein lies the difference between a profile and page.
Your profile is supposed to be YOU. It’s meant for personal use, connecting with friends, etc.
Other users must request to be your friend and you have to accept the request before they can see anything you post.
As for a Facebook page, other users only have to press a “Like” button to see content from them (you don’t have to accept the like, it automatically adds them to the followers of the business page).
How to create a Facebook page
To create a Facebook page for your business, log into your Facebook profile.
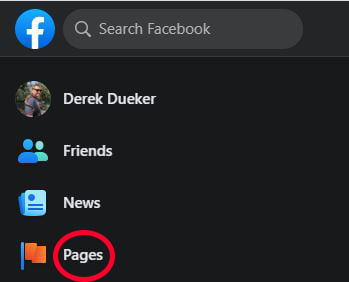
If you’re on a desktop computer, click on “Pages” on the left side of the screen.
If you’re on mobile, tap the three lines at the top of your app and look for the pages icon. It’ll still be the little flag.
After clicking on the pages button, you’ll select “Create New Page” and fill in all the page information.
You’ll need to type in the name of the page (your business name is fine), the category that best describes your business (you can select up to three), and a description of your business.
The description is optional but, if you can, I’d put a paragraph that quickly sums up the products or services your business offers.
Once you’ve created the page, you can invite others to post, manage, or be an admin of the page.
You should only add people you trust and are associated with your business like your co-owner or a social media manager.
You can find this section on your Facebook page on the left side of the page toward the bottom if you’re on desktop. It’ll have a little gear icon.
On mobile, you’ll select the pencil icon titled “edit page” and at the bottom of the populated list you’ll see settings.
Once in settings, look for the “Page Roles” option. It’ll have a silhouette of a person as the icon.
What information should I have on my Facebook page?
Now that you’ve got your page created and have invited any other admins, managers, etc., you can start adding photos and information.
You’ll want some high quality photos for both your profile picture and your header photo (the big banner at the top of your page).
Your profile photo should be your company logo or at least something else that your customers can easily identify as your business. The cover photo can be almost anything you want. We see most businesses change them up to display current promotions, upcoming events, or just cycling through different products or services.
However, you should NOT change your profile picture very often to avoid confusion.
As you went through the setup process for your page, you might have entered most of the imperative information for your page followers but make sure you have all of this entered and accurate:
- Hours of operation
- Telephone number
- Physical address
- Email address
- Website URL
What to post on your business’ Facebook page
Once you have your business page up and running, you need to be posting fairly frequently.
It doesn’t have to be every day but if you go a long time without posting, Facebook seems to almost penalize your page and not show new posts to all of your active followers.
Here’s what I mean:
What pops up on your personal Facebook feed (your profile) is not random. Facebook shows you content in the order of what it thinks you want to see.
The other people and pages it shows you towards the top of your feed are the ones the algorithm believes you will engage with (like, comment, or share).
So, if you haven’t been posting regularly your followers obviously can’t be engaging with you which will lower your position on their feeds or not show up at all sometimes.
Facebook’s algorithm also pushes videos and images to the top as those tend to get more engagement on average than text-only posts.
If you’re looking for specific types of posts to promote your business on social media this blog we posted a while back has a few ideas.
However, in general, you should:
- Almost always have a photo or video accompanying your posts
- Mix in some content that isn’t sales-related
- Share other pages’ content that is relevant to your brand
Organic posts, Facebook ads, and boosted posts
Some people get these a little confused (especially ads and boosted posts) so we thought we’d give you a quick rundown on the differences between them.
- Organic posts are the ones you make for free and are shown to people who already follow your page
- A boosted post starts out just like an organic post but then you can click on “Boost Post” in the bottom right of the post to show it to a larger audience outside of your followers. You’ll be able to target the type of people you want it shown to, set a max budget, and choose how long you want your post boosted.

- Facebook ads have a little more customization. They are created within Ads Manager which, on desktop, is on the left of your business page underneath “manage page” (seen below). If you want to stay on mobile, you’ll have to download a separate app called Facebook Ads Manager. With Facebook ads, you’re able to choose ad placement including whether or not you want it shown on Instagram as well (you’ll have to have an Instagram account for your business), use specific ad objectives (such as website traffic, conversions, lead generation), use advanced targeting methods so it’s only shown to the people you want, and you’ll have more creative control.

When to use Facebook ads and when to boost posts
In our opinion, you should use boosted posts if you’re trying to increase engagement or brand awareness.
If you’re trying to drive traffic to your website, increase sales, generate leads or the like, you’ll want to create a Facebook ad.
Just an FYI, we can handle all the work here from ad creation to running it for you. In fact, we can do social media ads on all the major platforms.
How to use Facebook events to promote your business
You might have been invited to a few events on Facebook before. Some people use them personally for birthday parties and such. Professional sports teams usually will create an event for all of their games.
However, it can be a great tool for your business too!
If you’re having a MAJOR sale, holding an event away from your normal location, or something else you think your customers would want to add to their calendars, a Facebook event is a perfect way to get the word out there.
To set up an event attached to your business page on desktop you need to first head over to your page and, on the first page you land on you can either click it over on the left side of the page or there is an area directly below “create post” as seen below.

On mobile, you have to navigate to your page. Then, at the very top of the screen you’ll see several grey buttons starting with “Overview,” “Ads,” etc.
Swipe right until you see a “… More” button like the one you see below.
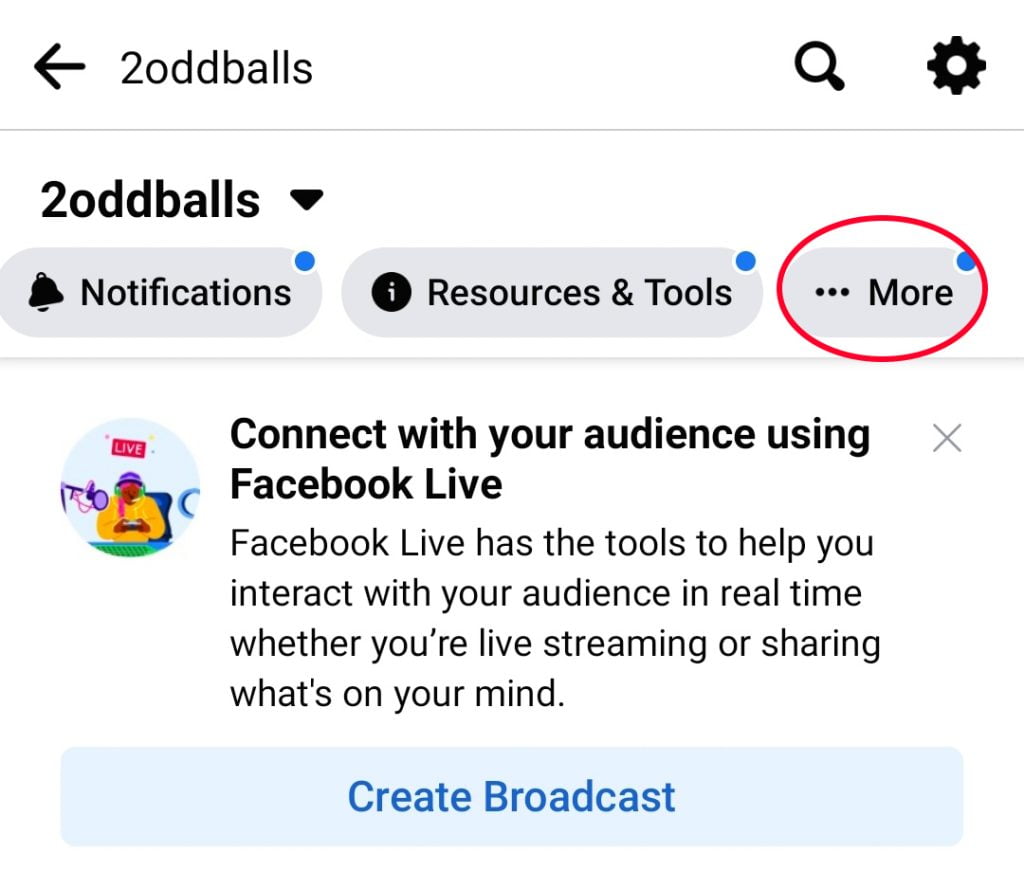
After selecting “More,” events should be the fourth option on the list.
How to create a successful Facebook event for marketing purposes
Facebook should walk you through setting up all the content for your event.
First, it’ll ask you whether your event is going to be online or in person. Select the appropriate one for your event.
Then, you’ll choose a name for your event.
Do your best to give your event as enticing of a name as you can and infuse your brand into it.
For example, if 2oddballs Creative was doing some event marketing for a local winery that is the headline sponsor for one night at a local comedy club, we might title our event “Sips & Sillies” or something (lame, I know, but just an example – sheesh).
Below that, you’ll select the start date and time as well as the end date and time.
For business page events, the privacy has to stay public, meaning anyone can see it. Which usually is what you want anyway.
Press next and choose the location by searching for the name of the location in which you are hosting your event. If you can’t find it, this step is optional and you can include the address in your event description.
Which brings us to our next step – the description and category.
Do not slack here. You need to write some compelling copy that would make a complete stranger want to come to this thing. Also, add any information they need to know that won’t appear anywhere else on the event page such as where to purchase tickets, where they can park (if you don’t have a spot for them), if food is provided, and so on.
Don’t forget to add a good photo for your event. We like to either use a high-quality photo from a past occurrence of this event or have a graphic designer create one.
Remember, this will probably be what causes them to stop scrolling more than the title or anything else. So, don’t just throw something random up.
If applicable, you can select “admission” to add a URL to where people can purchase tickets.
In “event settings” you can add co-hosts for the event to help you manage the event. You can also choose whether only hosts can post and if posts must be approved by hosts.